Getting Started
Due to the more complex build system and the addition of PyCPL as a dependency, we no longer recommend users download the 2dfdr source code and build it locally on their own systems.
Instead, we suggest users run 2dfdr in one of the following ways, in order of increasing difficulty:
Method |
Main Features |
Operating System |
User Level |
Offline Use |
|---|---|---|---|---|
Data Central Jupyterhub Service |
Python 3 notebooks and X11 Desktop (e.g. ds9, QFitsView) |
Any supported web browser |
All |
No |
Podman Desktop |
GUI assisted terminal access to run Python scripts and X11 applications |
MacOSX or Linux |
Intermediate to Advanced |
Yes |
Distrobox |
Simplified terminal access to run Python scripts and X11 applications |
Linux only |
Intermediate to Advanced |
Yes |
The Offline Use column above refers to the ability to run 2dfdr without an internet connection e.g. at a remote observatory with unstable internet access. This is achieved by downloading an environment with 2dfdr pre-installed for local use.
Developers familiar with containerised development may alternatively follow our instructions for development from a Linux system in the Developer Guide.
We do not recommend using this developer-oriented environment for any users to do their reductions.
Data Central Jupyterhub Service
The easiest way to access 2dfdr is to login to the Data Central Jupyterhub Service with your Data Central account and a supported web browser.
New users without a Data Central account can register here.
For security purposes, most users will first have to request access.
This can be done by submitting a Data Central Helpdesk ticket with some basic details including your name, institution and intended use e.g. reducing 2dF-AAOmega data.
Once verified by the Data Central team, access will be granted.
After logging in, you will be presented with a list of options. Select 2dfdr X11 Remote Desktop.
Typical load times are up to 20 seconds, but may sometimes take several minutes.
You will then be presented with a JupyterLab interface that includes an installation of 2dfdr.
General documentation on the interface is available from the JupyterLab Documentation.
Highlighted Capabilities
The JupyterLab interface allows for several exciting ways to use 2dfdr and more. The following image shows different options the user can choose from:
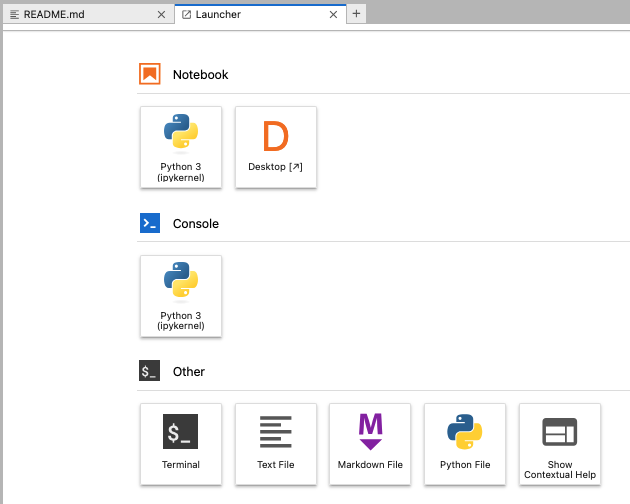
The result of selecting File -> New Launcher. The Desktop option will load an X11 Desktop in a new browser tab.
We highlight some of the capabilities each option has to offer:
Notebook (Python 3): Write and execute code in a Python 3 notebook to reduce 2dfdr data using e.g. import twodfdr. We provide some notebook examples to reduce some sample data.
Notebook (Desktop): Launch a full X11 Desktop to browse files and most importantly view FITS files using e.g. ds9 (see the screenshot below) and QFitsView. Use a text editor to write standalone Python scripts for reductions. The X11 Desktop provided by Jupyter Remote Desktop Proxy allows for almost native speed visualisation of your raw and reduced FITS data (e.g. right click and drag adjustment of contrast and bias within ds9).
Terminal: Edit and run your own standalone Python scripts.
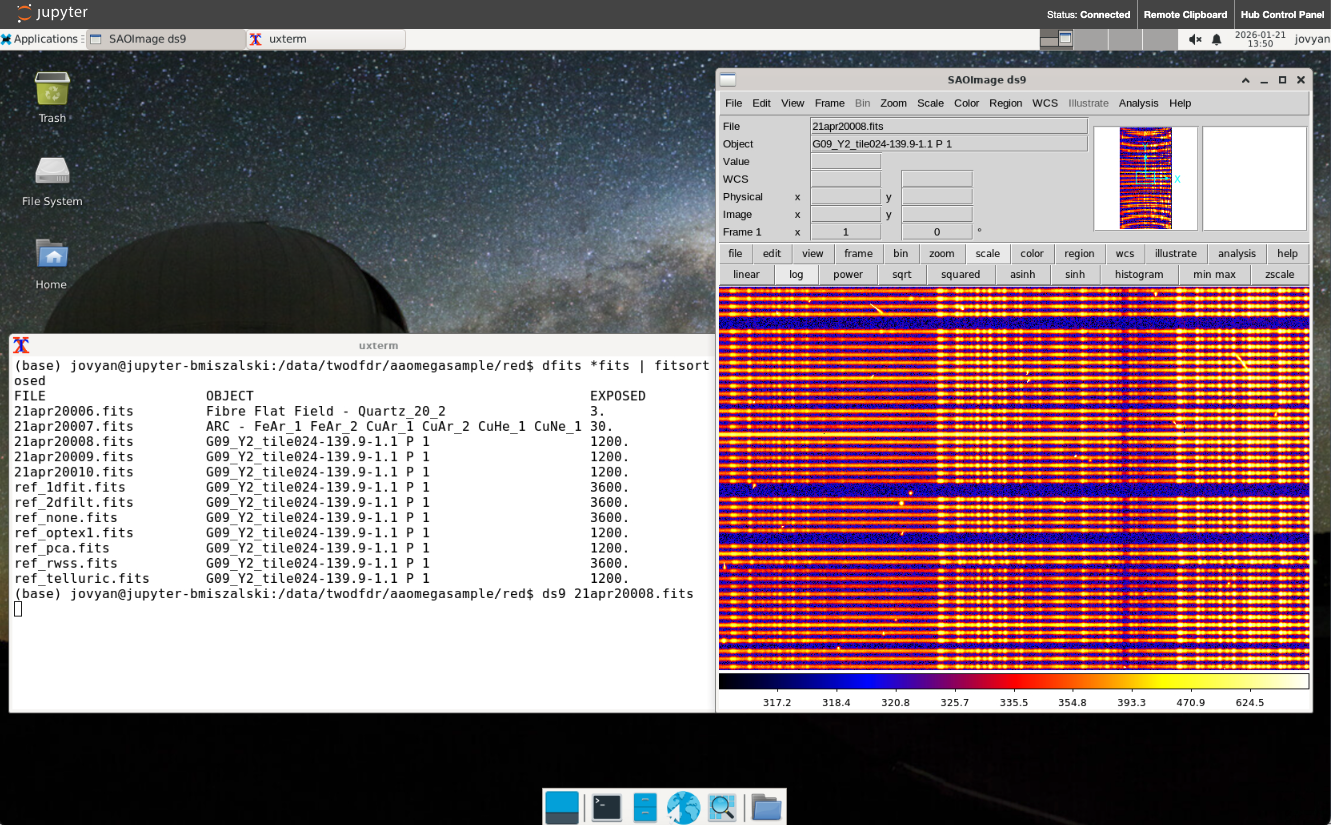
Example X11 Desktop session running in the Data Central Jupyterhub service showing XFCE window manager and ds9 viewing a 2dF-AAOmega exposure.
AAO Gitlab Personal Access Token
For the following Podman Desktop and Distrobox options, you will need to create a Personal Access Token:
Sign into the AAO Gitlab with your Data Central account at dev.aao.org.au.
Follow the instructions here. Make sure to choose all the read options as in the below figure.
Note down your Personal Access Token somewhere safe, as you can only view it once after creating it.
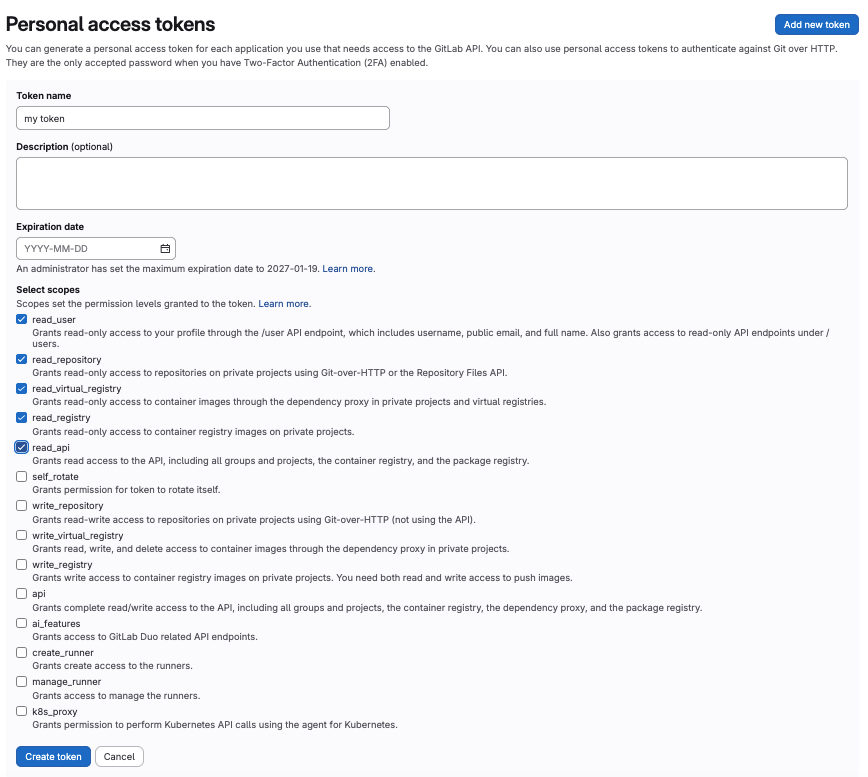
Options to select when creating your Gitlab Personal Access Token. Make sure all the read options are selected.
Podman Desktop
The Podman Desktop is a free and open source desktop tool to manage and run containerised software. It is suitable for MacOSX and Linux users. Podman Desktop is available for Windows systems, but we have not tested the following on Windows.
Users can download and run a 2dfdr image from the AAO gitlab container registry which contains a pre-built 2dfdr installation.
This provides a user experience similar to e.g. VMWare, whereby a separate environment is setup inside the host operating system to run the software.
The following steps will allow you to setup Podman Desktop on your MacOSX or Linux system.
Please note that while other alternatives may be used (e.g. Docker Desktop), we only recommend Podman Desktop due to its higher performance and simpler licensing agreement. We therefore limit our instructions to Podman Desktop.
More advanced usage may include X11 forwarding and/or a VNC session, allowing for X11 applications or desktop environments to be run. We will only cover the X11 forwarding here.
Install Podman engine. For linux users this can be done with:
# Ubuntu 20.10 and newer
sudo apt-get update
sudo apt-get -y install podman
A complete list of installation methods for other Linux distributions can be found here.
Install Podman desktop from here. While there are several installation options, we recommend only downloading the ``tar.gz`` archive, as it does not require any additional packages or software installation.
Once downloaded, extract the contents into a directory and run the executable
podman-desktop. If asked (in case you installed it via flathub), you will need to choose Podman when prompted for what extensions to include.Alternatively, you can install it via flathub.
If not already done, create a Podman machine for the first time (Mac and Windows only).
If not already done, create your AAO Gitlab Personal Access Token.
Click the Add registry button in top right of the Podman Desktop -> Settings -> Registries dialog window. Please enter the following:
URL - registry.aao.org.au:443
Username - your Data Central username
Password - your Personal Access Token (see above).
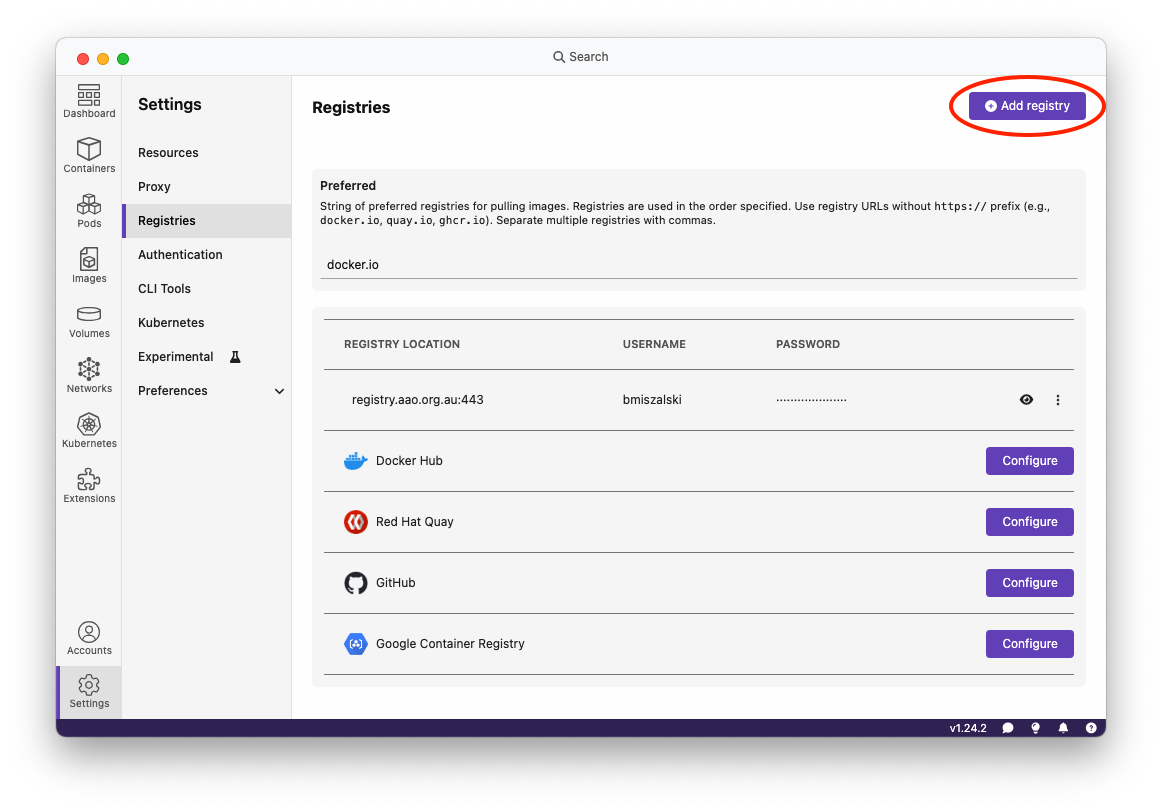
The Podman Desktop registries window.
Click the Pull button in the top right of the Podman Desktop -> Images dialog window. Enter registry.aao.org.au/rds/2dfdr/2dfdr:dev for the Image name to pull.
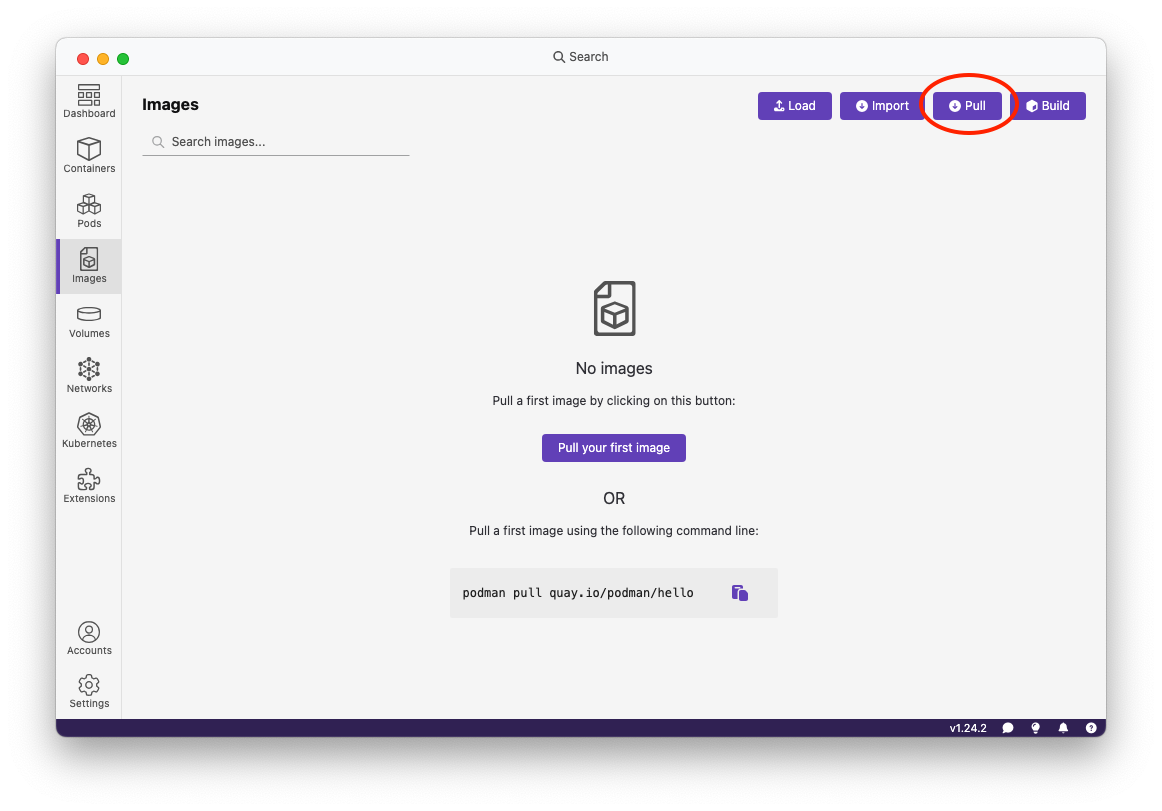
The Podman Desktop Images window.
This will download the 2dfdr:dev image which is a few GB in size. You should see something like the following. If you encounter any error messages, you may need to revisit step 2 above, namely creating a podman machine, or deleting and recreating an existing one. If this proves difficult, try to restart your system and try to create the podman machine again.
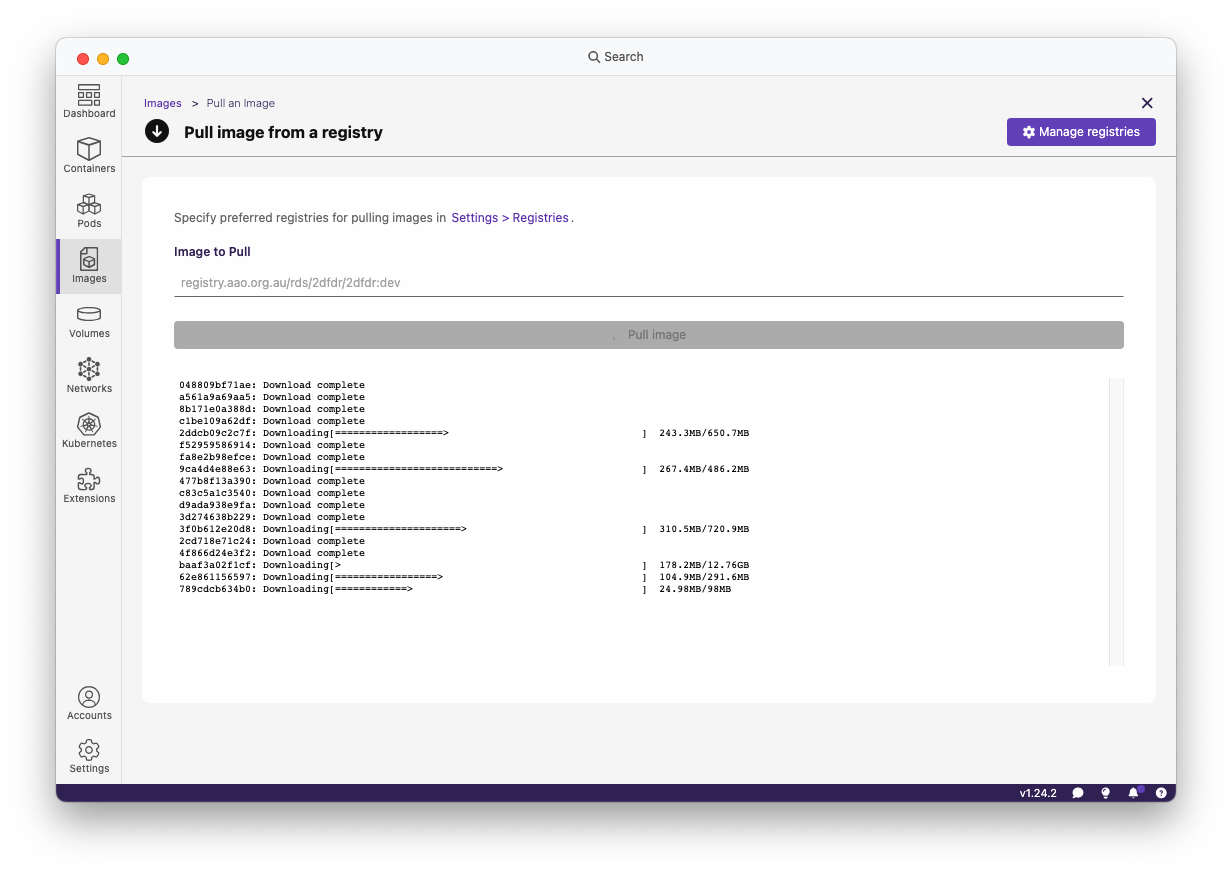
The Podman Desktop Images window.
Once the download is complete you should see the Image available in the Podman Desktop -> Images dialog window. Under actions, click the Play icon. This will take you to a screen to configure how the image is run.
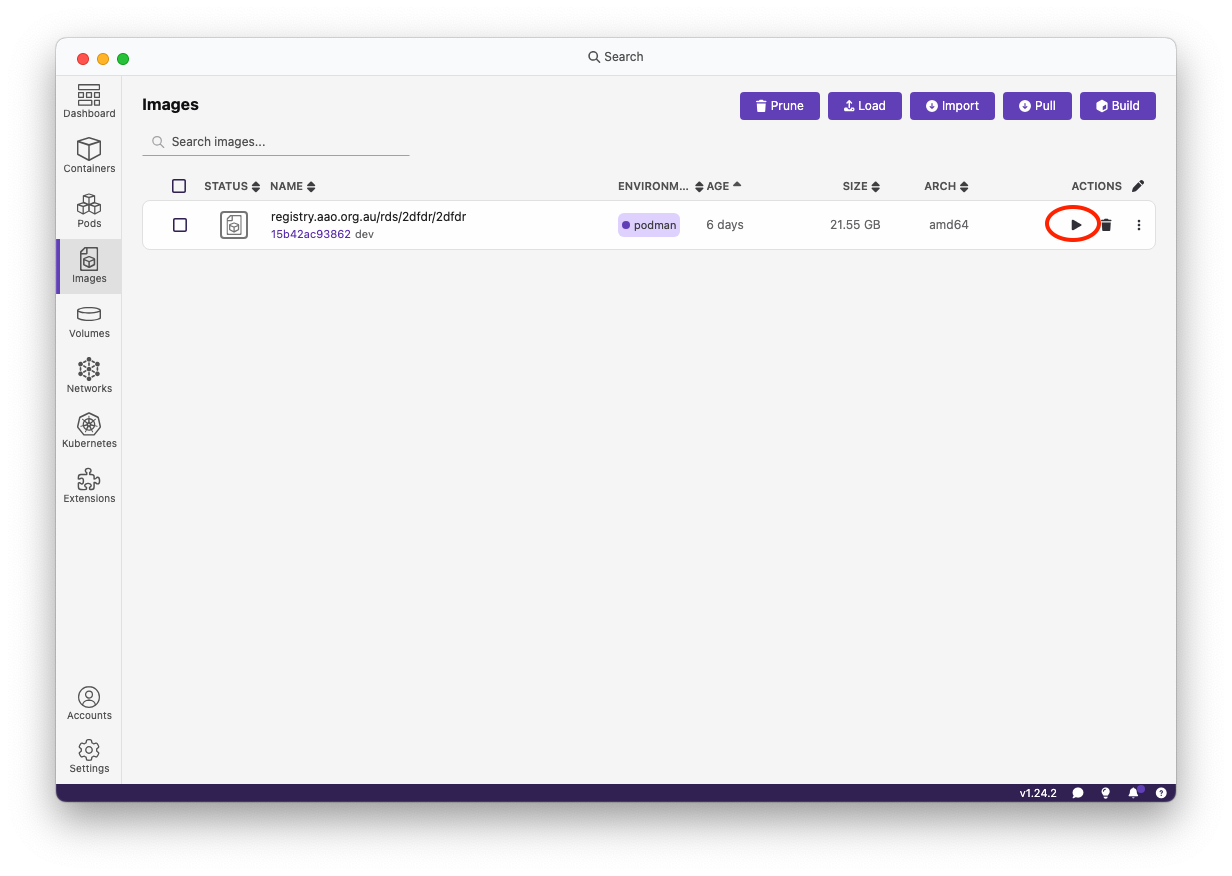
To run an image click its play button.
Now it’s time to configure how the image is run as a container. This will take you to a dialog to enter your own Volumes (i.e. folders to mount in, so that you can access them from within the environment, e.g. containing data to reduce) or Environment Variables. We suggest adding the environment variables in the following image, necessary for 2dfdr to work.

An example volume and environment variable configuration.
Variable |
Value |
|---|---|
DISPLAY |
host.docker.internal:0 |
CPLDIR |
/usr/local/eso |
LD_LIBRARY_PATH |
/usr/local/2dfdr/lib:/usr/local/eso/lib:$LD_LIBRARY_PATH |
PATH |
/usr/local/2dfdr/bin:$PATH |
DRCONTROL_DIR |
/usr/local/2dfdr/share/2dfdr |
DRCONTROL_DEV |
/usr/local/2dfdr/bin |
The DISPLAY variable is optional and also requires the Networking mode to be set to “Use the host networking stack” as in the image below.
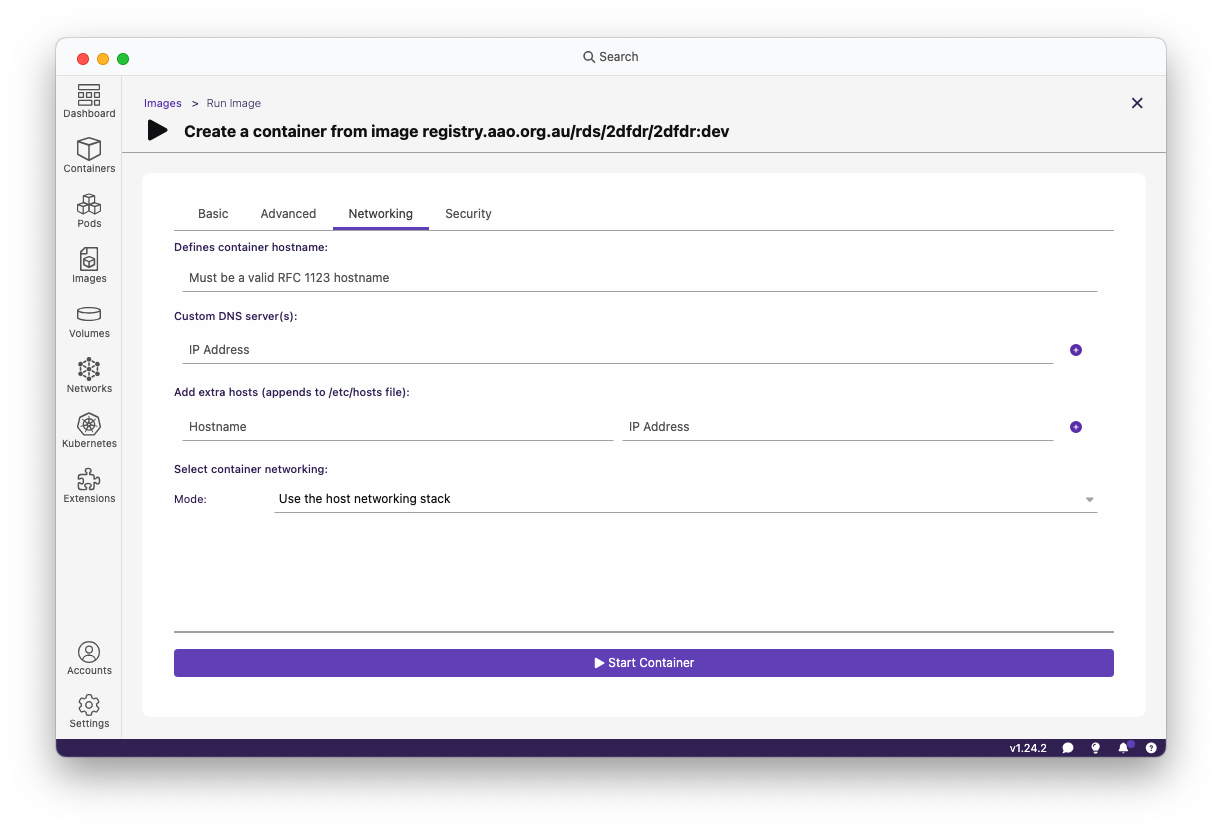
An example network configuration.
You are now read to click the Start Container button. Once the container has started, you can choose the Terminal tab in Podman Desktop to start using the virtual environment of the container with 2dfdr setup. To check the presence of cpl and twodfdr Python modules, you can print out their version numbers:
python3 -c 'import cpl;print (cpl.__version__);'
python3 -c 'import twodfdr;print (twodfdr.__version__);'
For MacOSX users, to launch X11 applications from within the container (e.g. ds9), you will need to have XQuartz installed. Furthermore, you will need to enable the option XQuartz -> Settings -> Security -> Allow connections from network clients and then run from a terminal:
xhost +
to disable access control for X11. Now you should be able run X11 apps from within the container.
Distrobox
For Linux users only, a more advanced alternative to Podman Desktop is Distrobox.
Distrobox allows users to run software inside containers in a seamless fashion with the host Linux operating system.
We recommend users watch the video at the Distrobox website (link above) to familiarise themselves with its operation. As in the Podman Desktop usage described above, users can download a pre-built 2dfdr image and enter the container to run 2dfdr.
If not already done, install either podman or docker on your Linux system.
Install distrobox.
In order to grant distrobox access to the AAO Gitlab Container Registry, we require your Personal Access Token (see above). You can then type in a terminal:
# In the following:
#
# <personal access token> == your AAO Gitlab Personal Access Token
# <username>              == your Data Central username.

# If you have podman installed
echo "<personal access token>" | podman login registry.aao.org.au:443 -u <username> --password-stdin

# If you have docker installed
echo "<personal access token>" | docker login registry.aao.org.au:443 -u <username> --password-stdin
Now we can pull the image from the AAO Gitlab Container Registry and create a distrobox environment called twodfdr. Again in the terminal:
distrobox create --pull -n twodfdr -i registry.aao.org.au:443/rds/2dfdr/2dfdr:dev
Now you can enter the container with 2dfdr pre-installed:
distrobox enter twodfdr
For more configuration details, see the Distrobox website. You will likely want to add the environment variables discussed above in the Podman Desktop section in one of the ways discussed here. This page also shows how to specify additional volumes to mount into the container.
Contact Us
We encourage users to thoroughly read the above links and relevant web documentation for the packages above in order to troubleshoot any problems that arise. Those still encountering problems are welcome to submit a Data Central Helpdesk ticket.