TWODFDR Developer Guide
This guide explains how to set up your development environment and contribute code to 2dfdr.
Prerequisites
Before contributing, make sure you have completed the following setup steps:
Getting an AAO Gitlab Personal Access Token
Install/get the Docker container via:
or logging into Data Central Jupyterhub Service.
The recommended way to contribute is to work from a clean Docker image and submit changes via a merge request to the GitLab repository.
Development Environment Overview
The source code can be found at /code/dev.
This directory contains many files, but contributors primarily interact with three components:
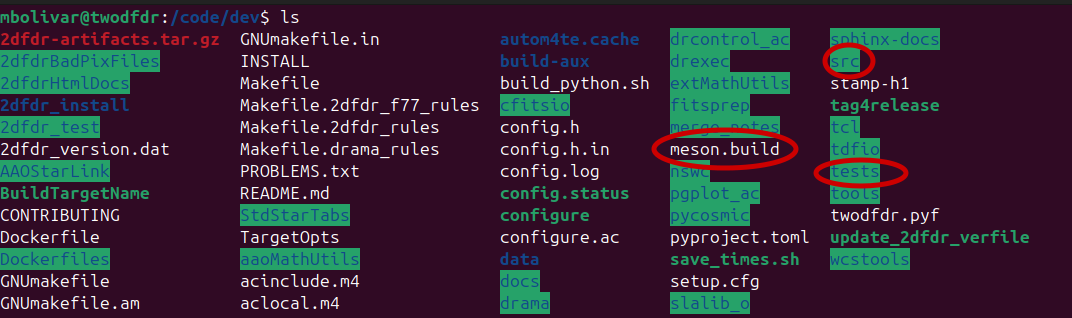
Key directories and files
twodfdr: Contains the Python modules, methods, and recipes that works as wrappers around the bindings of the 2dFdr code. Here is where most community contributions will be made.
meson.build: Controls compilation of the Python wrapper and integration with the legacy code. New modules must be added to this file to be included in the build (see the example in New module implementation: hello world).
tests: Contains unit tests and higher-level pipeline tests. New functionality (recipes, modules, functions) should include corresponding tests whenever possible.
Testing
We have developed a list of tests in tests to check that all twodfdr recipes, modules and functions work properly:
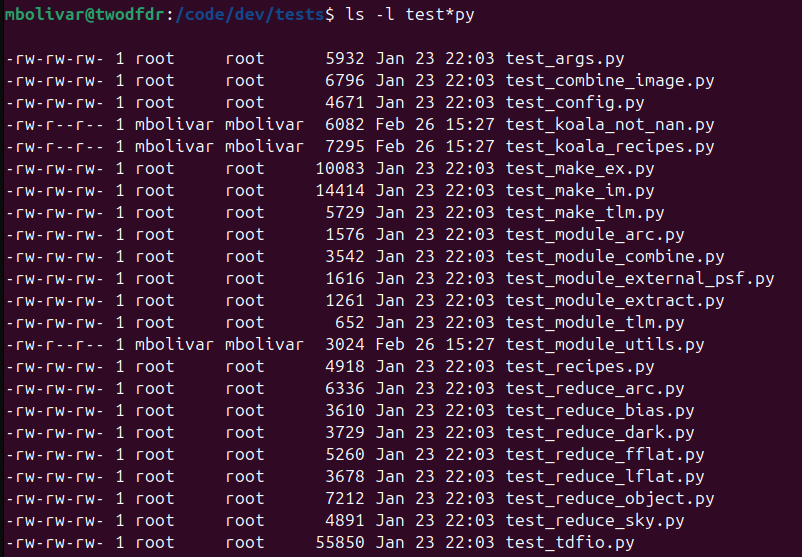
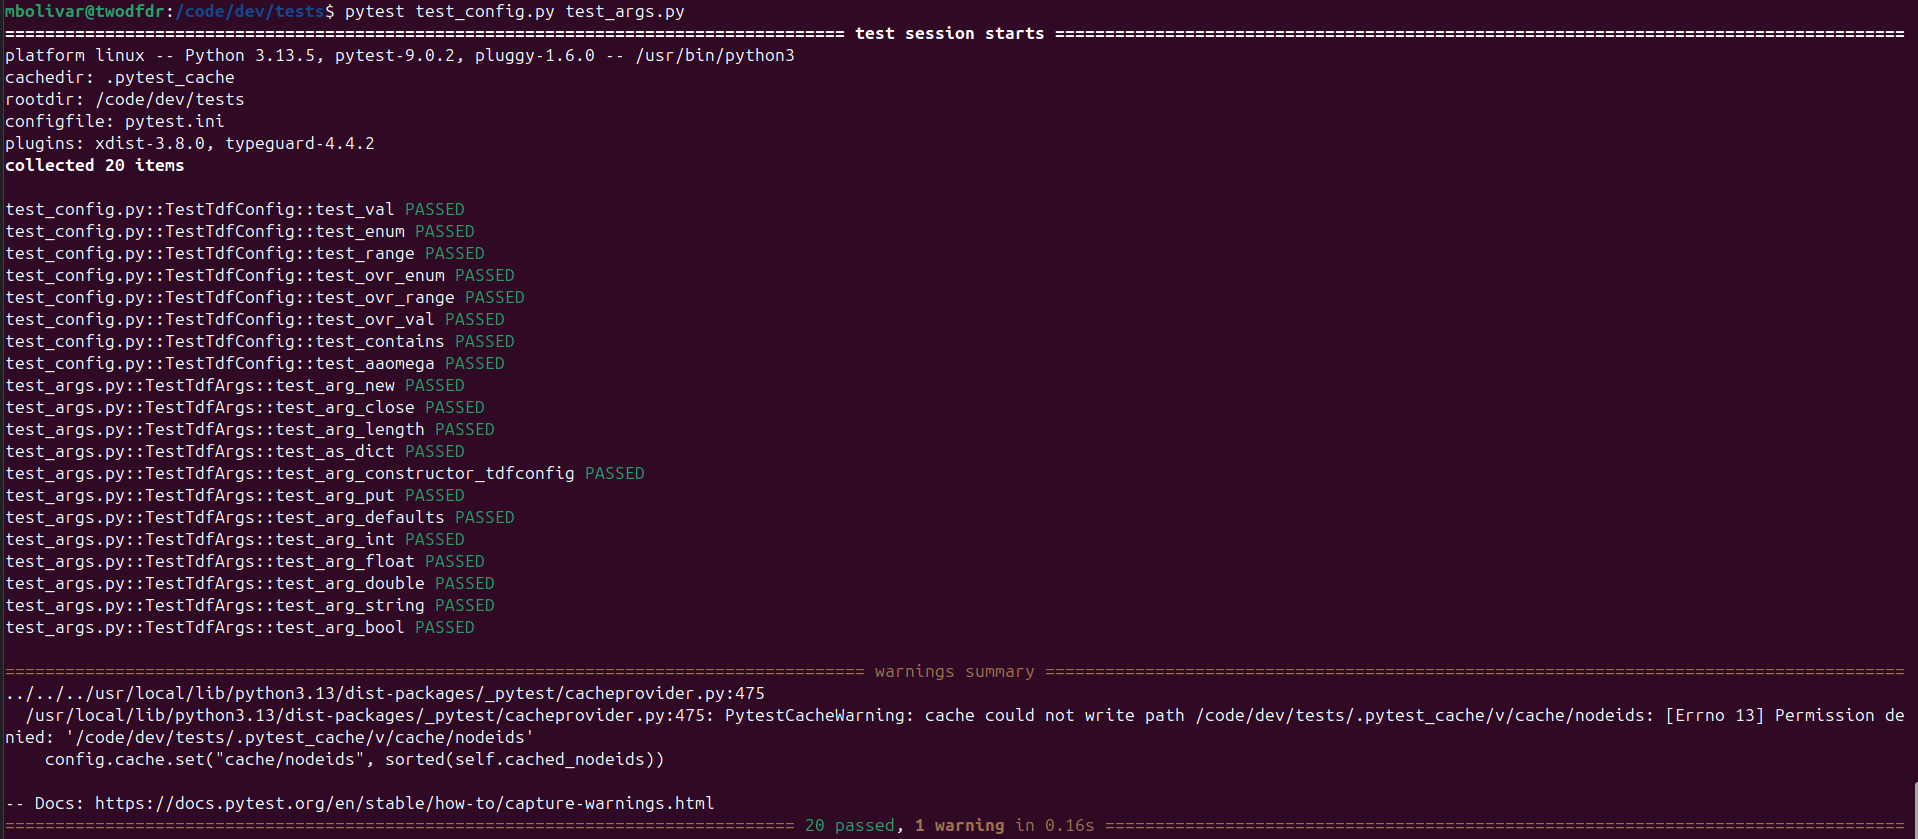
Some of these tests can be run without any additional data (test_args.py, test_config.py):
Other scripts require some external data, which can be found here.
For example, test_tdfio.py needs data from:
You will need to set up the environmental variable TDFDR_TESTDATA_ROOT where the data will be stored in your particular container. For this example, we will set it in /code/dev/data:
# sets data test directory
export TDFDR_TESTDATA_ROOT="/code/dev/data/"

# creates and enters data test directory
mkdir -p /code/dev/data/
cd /code/dev/data

# gets datasets
git clone https://dev.aao.org.au/rds/2dfdr/sample/aaomegasample.git
git clone https://dev.aao.org.au/rds/2dfdr/sample/twodfdrsample.git
git clone https://dev.aao.org.au/rds/2dfdr/sample/KOALASample.git
git clone https://dev.aao.org.au/rds/2dfdr/sample/aaomeganssample.git
git clone https://dev.aao.org.au/rds/2dfdr/sample/aaomegaminishufflesample.git
then we run test_tdfio.py:

The list is too long to show complete, but at the end you should get a summary of the test results for test_args.py and test_config.py:
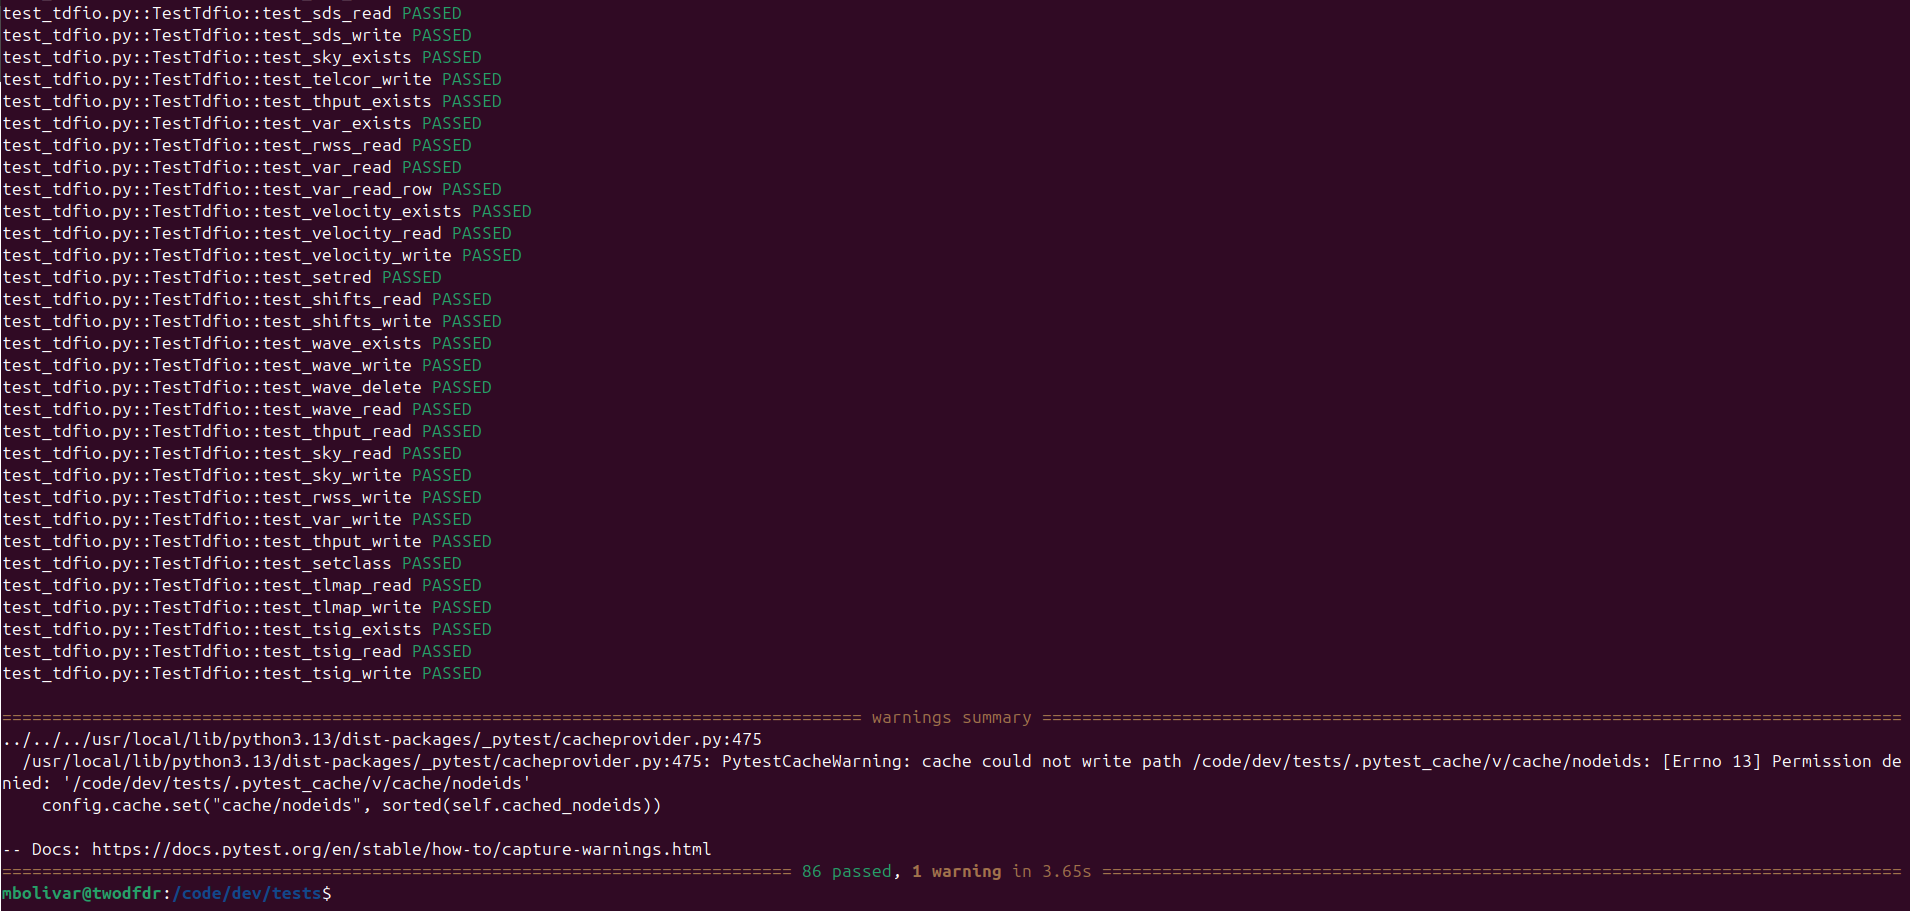
It is worth mentioning that some of the tests may take almost an hour to run, so consider doing so only if it is needed.
Common Contribution Tasks
Most contributions fall into one of two categories:
Adding or modifying a function in an existing module
Creating a new module (which also includes adding a new function)
Both require reinstalling the twodfdr wrappers, that is:
cd /code/dev
# uncomment the following line to compile 2dfdr from source
# make all install
# the above step is not needed unless you are actively changing the Fortran code
# build and install the twodfdr Python module
sudo pip install . --break-system-packages
Developers who want to modify the FORTRAN code are advised to get in touch with us.
Adding a new module
In general to create a new module for twodfdr, we follow these steps:
Write the new module in
src/twodfdr/modules/Register module in
src/twodfdr/modules/__init__.pyAdd new module in the modules listed in
install_sourcesin meson.build (check example below)Add tests (recommended).
Rebuild with:
sudo pip install . --break-system-packages
New module implementation: Hello world
Since creating a new module also implies adding a new function, we can use a single example for both cases.
Let’s add a new module for a new instrument. The new module Dropbear will contain a function vegemite that writes a new header called VEGEMITE with a corresponding “Hello world” as default (but that can be changed by the user).
In modules add the new module dropbear.py containing the class Dropbear:
from twodfdr import _twodfdr
from twodfdr import args
from enum import Enum
from twodfdr.io import *
from astropy.io import fits
from pathlib import Path
from warnings import warn
import numpy as np


class Dropbear():
    """
    Dummy class that helps as example of code contribution for twodfdr.

    Notes
    -----
    """

    @staticmethod
    def vegemite(obj, comment='Hello world'):
        """
        Adds the VEGEMITE header with a comment in the FITS file.

        Parameters
        ----------
        obj : Tdfio
            Input object of the FITS file.

        Notes
        -----
        TdfioKeyType.STR is for storing header values as string.

        """
        obj.key_write('VEGEMITE', TdfioKeyType.STR, comment)
Then, open __init__.py and add the dropbear module:
__all__ = ['Arc',
           'TLM',
           'Combine',
           'StackMethod',
           'DeriveShifts',
           'ExternalPsf',
           'FibThput',
           'Flat',
           'Koala',
           'Obj',
           'Scrunch',
           'SigmaProfile',
           'Sky',
           'Transfer',
           'Utils',
           'MakeIm',
           'Dropbear'  # <----- HERE
           ]
from twodfdr.modules.tlm import *
from twodfdr.modules.arc import *
from twodfdr.modules.combine import *
from twodfdr.modules.derive_shifts import *
from twodfdr.modules.external_psf import *
from twodfdr.modules.fib_thput import *
from twodfdr.modules.flat import *
from twodfdr.modules.koala import *
from twodfdr.modules.obj import *
from twodfdr.modules.scrunch import *
from twodfdr.modules.sigma_profile import *
from twodfdr.modules.sky import *
from twodfdr.modules.tlm import *
from twodfdr.modules.transfer import *
from twodfdr.modules.utils import *
from twodfdr.modules.image import *
from twodfdr.modules.dropbear import *  # <----- AND HERE
We also add it in meson.build:
py3.install_sources([
    'src/twodfdr/modules/__init__.py',
    'src/twodfdr/modules/external_psf.py',
    'src/twodfdr/modules/tlm.py',
    'src/twodfdr/modules/sigma_profile.py',
    'src/twodfdr/modules/derive_shifts.py',
    'src/twodfdr/modules/utils.py',
    'src/twodfdr/modules/velcor.py',
    'src/twodfdr/modules/arc.py',
    'src/twodfdr/modules/sky.py',
    'src/twodfdr/modules/flat.py',
    'src/twodfdr/modules/scrunch.py',
    'src/twodfdr/modules/combine.py',
    'src/twodfdr/modules/cosmic.py',
    'src/twodfdr/modules/transfer.py',
    'src/twodfdr/modules/koala.py',
    'src/twodfdr/modules/fib_thput.py',
    'src/twodfdr/modules/obj.py',
    'src/twodfdr/modules/cosmic.py',
    'src/twodfdr/modules/image.py',
    'src/twodfdr/modules/extract.py',
    'src/twodfdr/modules/background.py',
    'src/twodfdr/modules/dropbear.py',  # <----- HERE
    ],
    subdir: 'twodfdr/modules'
)
Installation
Like we mentioned before, every change in the modules requires reinstalling twodfdr in the container (regardless of being run in podman, distrobox or Jupyter hub):
cd /code/dev
sudo pip install . --break-system-packages
Implementation
Let’s use this module in a script. First, make sure you have defined the environmental variable TDFDR_TESTDATA_ROOT like we did for testing:
export TDFDR_TESTDATA_ROOT="/code/dev/data/"
Then, using this example script:
from twodfdr.modules.dropbear import Dropbear
from pathlib import Path
import os
from twodfdr.io import Tdfio

# Uses the test directory (make sure to have TDFDR_TESTDATA_ROOT in the correct path)
data_dir = Path(os.environ.get("TDFDR_TESTDATA_ROOT"))

# Input file
im_file = data_dir / 'aaomegasample/blue/21apr10008.fits'

# Output file
output_file = './fake_koala.fits'

# Make a copy of the input file
tim = Tdfio.create_by_copy(im_file, output_file)

# Add the header key and comment in the copy (output)
Dropbear.vegemite(tim)

# Close the Tdfio object
tim.close()
We can check that the script worked by checking the headers of the generated FITS files:
mbolivar@twodfdr:/code/dev/sandbox$ fitsheader fake_koala.fits | grep 'VEGEMITE'
VEGEMITE= 'Hello world'
mbolivar@twodfdr:/code/dev/sandbox$ fitsheader custom_fake_koala.fits | grep 'VEGEMITE'
VEGEMITE= 'Fake koala repellent'
Adding a test
Now that we have implemented and used the new module, it is time to add a test, to make sure that the code base hasn’t been broken with our contribution, and to check that even edge cases work as intended.
We just added a single function in the code base, which means we just need to create a unit test for it. Given that the function just manipulates the FITS headers, but doesn’t touch the actual data in the files, we can add the test at the end of test_tdfio.py (after test_tsig_write in the latest version of the script, but still in the TestTdfio class) in the tests directory:
# This Python class contains the unit tests for io.py functions/methods
class TestTdfio:

.
.
.

    # test_vegemite is the unit test for Dropbear.vegemite()
    def test_vegemite(self, copy_tmp_files):

        custom_comment = 'Fake koala repellent'

        # copy_tmp_files makes a copy of a file (or list of files) to use them in test and left the originals unaltered.
        # In this case we make two copies because we will use the function for two cases, one with the default comment
        # and one for the custom comment.
        tmp_files = copy_tmp_files([self._rsig, self._rsig])

        tveg = Tdfio.open(fname=tmp_files[0], fmode=TdfioMode.RW, ftype=TdfioType.STD)
        tveg_custom = Tdfio.open(fname=tmp_files[1], fmode=TdfioMode.RW, ftype=TdfioType.STD)

        # Writes the VEGEMITE header in the tmp copies. One with the default comment and the other with the custom one.
        Dropbear.vegemite(tveg)
        Dropbear.vegemite(tveg_custom, comment=custom_comment)

        # Closes the Tdfio objects/FITS files (similar as the close() method used in astropy).
        tveg.close()
        tveg_custom.close()

        # Opens the FITS files with astropy to check independently the output of the tested function.
        hdul = fits.open(tmp_files[0])
        hdul_custom = fits.open(tmp_files[1])

        # assert command is used in test to confirm if a statement is True or False.
        # In this case, it checks that both test FITS files have the 'VEGEMITE' header.
        assert 'VEGEMITE' in hdul[0].header
        assert 'VEGEMITE' in hdul_custom[0].header

        # These assert statement check that the right comment is in each header. Second line track that default option
        # was not used by the function by mistake.
        assert hdul[0].header['VEGEMITE'] == 'Hello world'
        assert hdul_custom[0].header['VEGEMITE'] != 'Hello world'
        assert hdul_custom[0].header['VEGEMITE'] == custom_comment

        hdul.close()
        hdul_custom.close()
Function copy_tmp_files is a fixture, which is a special kind of function used in pytest. Fixtures allow modularity in the unit tests by managing setup services, state, or other operating environments. Notice how the test takes the fixture as parameter test_vegemite(self, copy_tmp_files). To create a fixture, we use the Python decorator @pytest.fixture:
/code/dev/tests/test_tdfio.py
@pytest.fixture
def copy_tmp_files(tmp_path):
    def _copy(input_files):
        output_files = []
        if not isinstance(input_files, list):
            input_files = [input_files]
        for int_file in enumerate(input_files):
            out_file = 'tmpfile_' + str(int_file[0]) + Path(int_file[1]).suffix
            out_file = tmp_path / Path(out_file)
            shutil.copy(int_file[1], tmp_path / out_file)
            output_files.append(out_file)

        return output_files

    yield _copy
While initially confusing, stating this function like a fixture allows us to have a better structure and clarity in the test units. For more information about how to implement fixtures, check the pytest documentation.
Using git to publish contributions
All development follows the project branching workflow. Contributions are never made directly to dev or master branches in gitlab. Instead, work is done in dedicated feature branches that are later merged into dev via Merge Request (MR). The first part of the process is making a local commit of the code changes done by the user using git.
Create a development branch
Let’s make a commit of the dropbear module. From /code/dev:
git checkout dev
git pull origin dev
git checkout -b new_branch
Configure git
First, if you haven’t done so, make sure you configure your local git credentials so you can make pull request of the code:
git config --global user.email "you@example.com"
git config --global user.name "Your Name"
Just change email and username for the ones you use for gitlab.
Commit changes
Use git add to put all modified files that you want to include in you code update and git commit to confirm the changes in your local code version:
git add dropbear.py __init__.py meson.build
git commit -m 'New instrument module. Bring your vegemite'
The flag -m is used to add a commit message explaining the changes.
Create a Merge Request
If you only commit your changes, they will be stored locally (in your own docker container). In order to complete a community contribution of the code, the local commit has to be reviewed and tested. This entire process is called Continuous Integration (CI), and allows to have a better control in each code change/update.
We started the MR by pushing the local commit in the remote repository in gitlab:
git push origin new_branch
NOTE: If you get an Author identity unknown message, verify that you follow the configure git steps.
Go to the GitLab repository and select Create merge request.

Select the option Change branches:

Then change target branch to dev and click Compare branches and continue
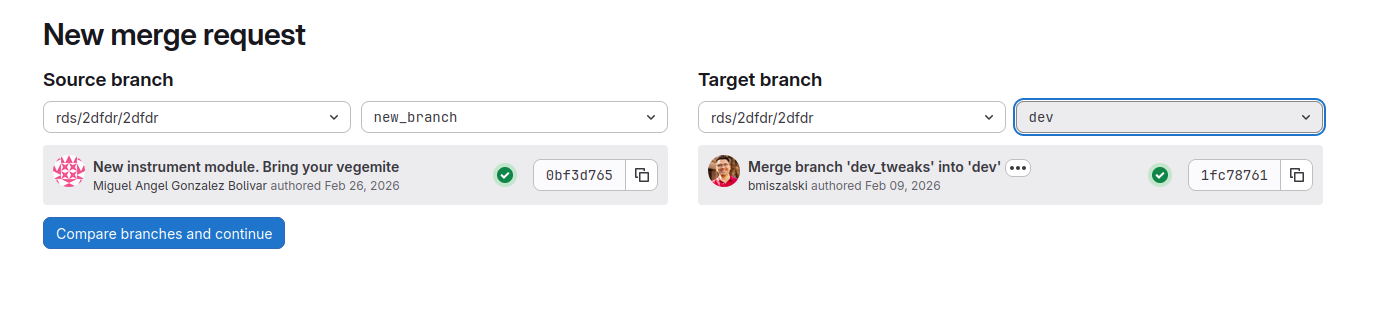
Give as much details in the Description box about your changes as possible. Finally, select Create merge request.

Done.
Submit a gitlab issue
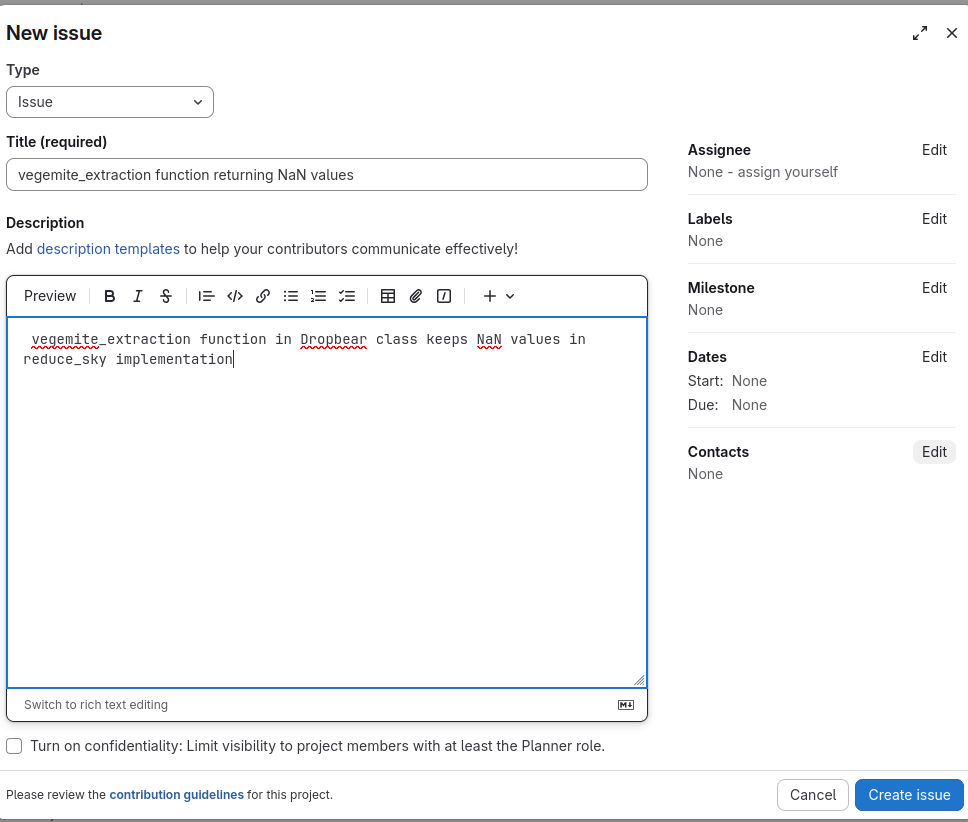
If you encounter a bug, unexpected behaviour, or want to request a feature, please submit a gitlab issue.
From the project sidebar, select Issues:

Click New item in the top-right corner.

Provide a clear and descriptive report:
Reporting guidelines
To help developers resolve issues quickly, please try to follow these guidelines as you see fit:
Be specific and concise
Include reproducible steps
Mention the module or function affected
Provide example inputs if relevant
State the environment (Docker image, branch, etc.)
PyCosmic integration
PyCosmic is a Python package created by Bernd Husemann and John Pritchard to detect cosmics in single CCD exposures from astronomical instruments, specifically fiber-fed integral-field spectrographs. We have integrated PyCosmic in twodfdr as the default method to remove cosmic rays, although the legacy methods are still available to use. Users can implement any cosmic ray removal method by adding the cccdim_clean function from the Cosmic class.
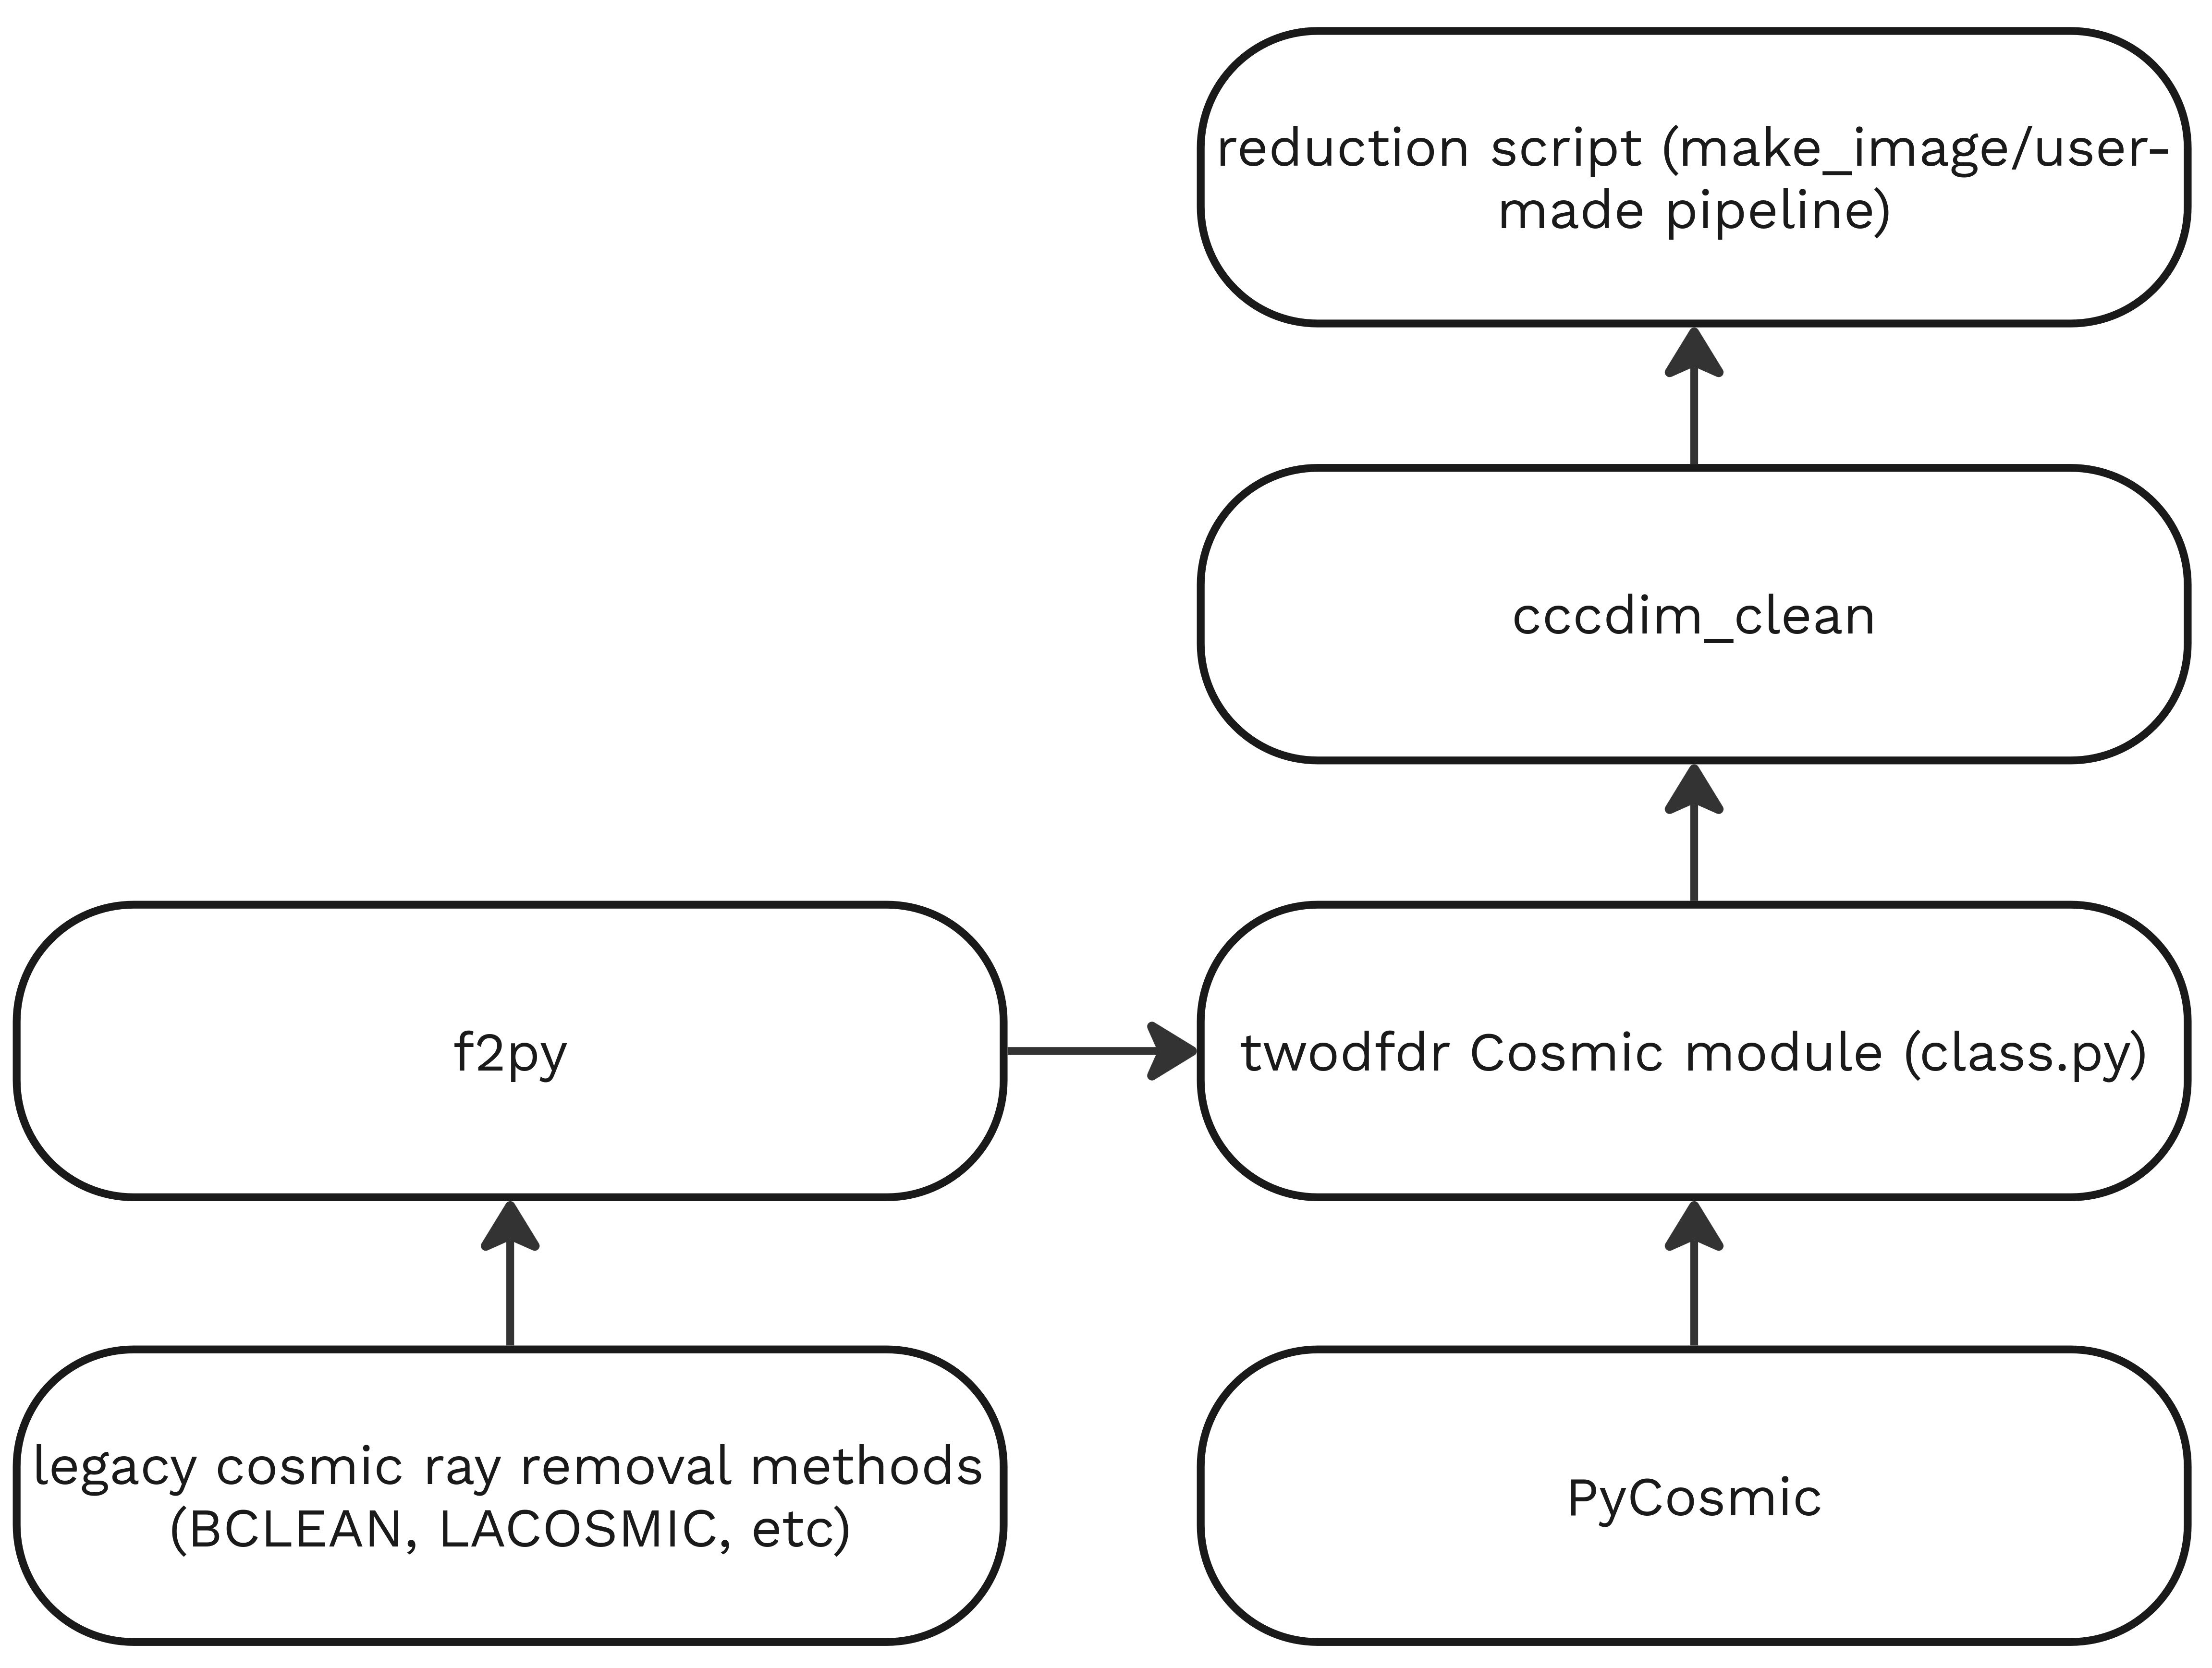
We also created a function to save cosmic removal parameters in the FITS headers (check Cosmic.write_cosmic_metadata).
Example
Let’s use PyCosmic via twodfdr wrappers to remove rays in a raw image.
Run the following script in a new directory. Make sure to have set the environmental variable TDFDR_TESTDATA_ROOT where the aaomegasample is stored in your container.
from twodfdr.modules.cosmic import Cosmic
from astropy.io import fits
from twodfdr import config
from twodfdr.io import Tdfio
from twodfdr import args
from pathlib import Path
import os

# Uses the test directory (make sure to have TDFDR_TESTDATA_ROOT in the correct path)
data_dir = Path(os.environ.get("TDFDR_TESTDATA_ROOT"))

# Input image
im_file = data_dir / 'aaomegasample/blue/21apr10008.fits'

# Output images for 2 different set of cosmic removal parameters (PyCosmic)
im_outfile_iter5 = './21apr10008_default_pycosray.fits'
im_outfile_iter7 = './21apr10008_custom_pycosray.fits'

# Extracting grating data
hdul = fits.open(im_file)
grat = str(hdul[0].header['GRATID'])
hdul.close()

# Creating the TdfConfig object using the proper grating
c = config.AAOmega(grating=grat)

# Creating the TdfArgs object from the TdfConfig
ta = args.TdfArgs(cfg=c)

# Set "PYCOSMIC" as method to remove cosmic rays
ta.putc("COSRAY_MTHD", 'PYCOSMIC')
cosray_mthd = ta.getc("COSRAY_MTHD")

# Using PyCosmic with default settings with its output in 21apr10008_default_pycosray.fits
ta.putc("IMAGE_FILENAME", im_outfile_iter5)

# Make a copy of the input file to make the cosmic ray removal (or full reduction)
tim_5 = Tdfio.create_by_copy(im_file, im_outfile_iter5)

# Calls PyCosmic via cccdim_clean
Cosmic.cccdim_clean(tim_5, ta, cosray_mthd)

# Saving cosmic removal settings in fits headers
Cosmic.write_cosmic_metadata(tim_5, ta, cosray_mthd)

# Using PyCosmic with custom settings with its output in 21apr10008_custom_pycosray.fits
ta.putc("IMAGE_FILENAME", im_outfile_iter7)
ta.putc("PYC_ITERS", 7)
ta.putc("PYC_SDET", 6)
ta.putc("PYC_XFWHM", 2.5)
ta.putc("PYC_YFWHM", 2.5)

# Make a copy of the input file to make the cosmic ray removal (or full reduction)
tim_7 = Tdfio.create_by_copy(im_file, im_outfile_iter7)

# Calls PyCosmic via cccdim_clean
Cosmic.cccdim_clean(tim_7, ta, cosray_mthd)

# Saving cosmic removal settings in fits headers
Cosmic.write_cosmic_metadata(tim_7, ta, cosray_mthd)
Checking the output, you can see the difference between the raw data, the result with PyCosmic default settings, and with custom parameters:
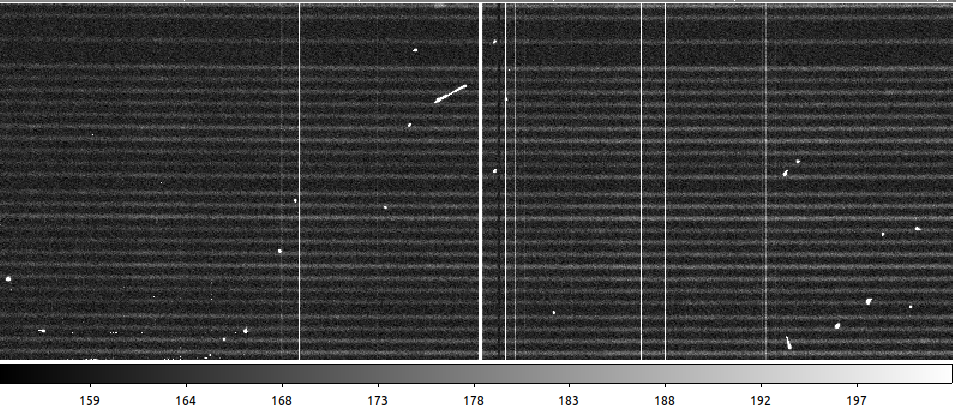
Raw data
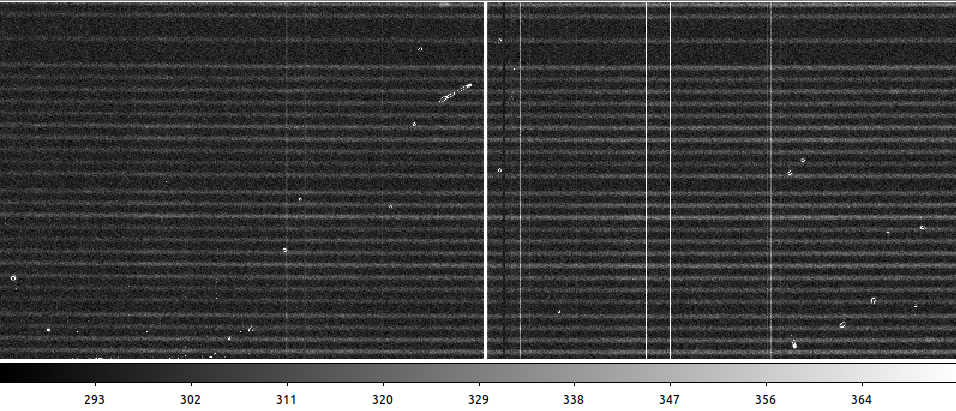
PyCosmic default settings
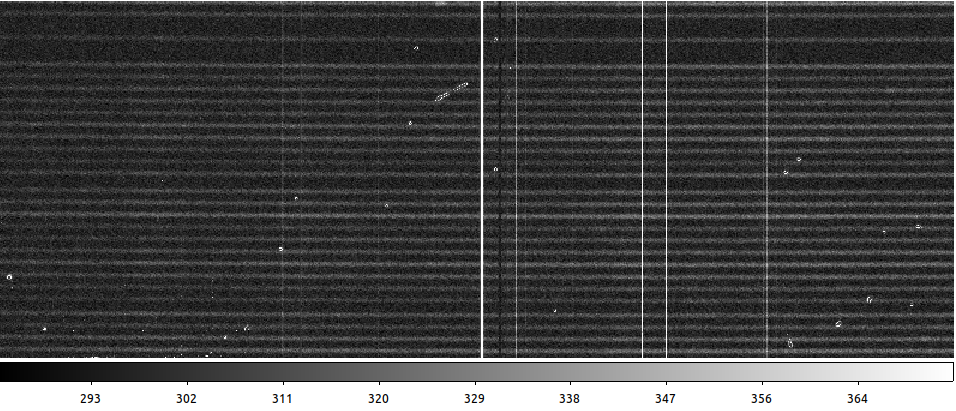
PyCosmic custom settings (done by a theoretical, not observational astrophysicist)